Build
Before you can download the application on your target device, you need to build it. There are various ways to trigger a build:
-
In the Explorer view
 , right-click the
 *.csolution.ymlfile and select Build solution. -
In the CMSIS view
 , click
  .
.
Continue to load and run the solution.
Build output
After you initiate the build process, a Terminal opens and displays the build operation:
🔄 Execute: cbuild /Users/user/Git/Org/Blinky_PL10-CNANO/Blinky.csolution.yml --target all --active PIC32CM6408PL10048 --packs --skip-convert
Building CMake target 'Blinky.Debug+PIC32CM6408PL10048'
Using compiler: AC6 V6.24.0
[20/20] Linking C executable /Users/user/Git/Org/Blinky_PL10-CNANO/out/Blinky/PIC32CM6408PL10048/Debug/Blinky.axf
Program Size: Code=24128 RO-data=1304 RW-data=196 ZI-data=4652
[1/1] cd /Users/user/Git/Org/Blinky_PL10-CNANO/tmp/1 &...Git/Org/Blinky_PL10-CNANO/out/Blinky/PIC32CM6408PL10048/Debug
✅ Completed: cbuild succeed with exit code 0
The output directory usually contains an ELF (.axf) and a HEX (.hex) file.
To learn about the solution structure, refer to CMSIS-Toolbox documentation
Tip
You can (re-)run the build command also manually in a VS Code Terminal window. This enables you to add further
options (for example --debug) to it.
Load and Run
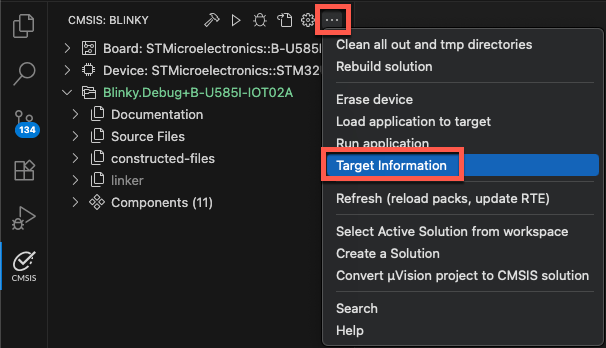
Check target information
In the CMSIS view, click ![]() and then select "Target Information" to
check that your target is connected.
and then select "Target Information" to
check that your target is connected.
In the Terminal, the result of the pyocd list command is shown:
 *  Executing task: pyocd list --cbuild-run /Users/user/Blinky/Blinky+B-U585I-IOT02A.cbuild-run.yml

  #   Probe/Board      Unique ID                  Target
-------------------------------------------------------------------
  0   STLINK-V3        001000254D46501220383832   ✖︎ stm32u585aiix
      B-U585I-IOT02A
Note
- Various debug adapters are supported. Select them using the manage solutions dialog. The configure run and debug chapter explains the details.
- If your debug adapter is not shown, make sure that all drivers are installed and that the target is connected to the PC.
Download and run the application
In the CMSIS view, click ![]() . This executes the "Load & Run application" command
that executes the commands
. This executes the "Load & Run application" command
that executes the commands CMSIS Load and CMSIS Run from the tasks.json file. This flashes the project onto the
target and issues a reset to start the application.
To verify that the step has run correctly, check the Terminal output:
 *  Executing task: pyocd load --probe stlink: --cbuild-run /Users/user/B-U585-Board/Blinky/Blinky+B-U585I-IOT02A.cbuild-run.yml

0000712 I Loading /Users/user/B-U585-Board/Blinky/out/Blinky/B-U585I-IOT02A/Debug/Blinky.axf [load_cmd]
[==================================================] 100%
0003015 I Erased 49152 bytes (6 sectors), programmed 49152 bytes (48 pages), skipped 0 bytes (0 pages) at 20.96 kB/s [loader]
 *  Terminal will be reused by tasks, press any key to close it.

 *  Executing task: pyocd gdbserver --probe stlink: --connect attach --persist --reset-run --cbuild-run /Users/user/B-U585-Board/Blinky/Blinky+B-U585I-IOT02A.cbuild-run.yml

0000251 I Target type is stm32u585aiix [board]
0000434 I DP IDR = 0x0be12477 (v2 MINDP rev0) [dap]
0000511 I debugvar 'DbgMCU_AHB1_Fz' = 0x0 (0) [cbuild_run]
0000511 I debugvar 'DbgMCU_AHB3_Fz' = 0x0 (0) [cbuild_run]
0000511 I debugvar 'DbgMCU_APB1H_Fz' = 0x0 (0) [cbuild_run]
0000511 I debugvar 'DbgMCU_APB1L_Fz' = 0x0 (0) [cbuild_run]
0000511 I debugvar 'DbgMCU_APB2_Fz' = 0x0 (0) [cbuild_run]
0000511 I debugvar 'DbgMCU_APB3_Fz' = 0x0 (0) [cbuild_run]
0000511 I debugvar 'DbgMCU_CR' = 0x6 (6) [cbuild_run]
0000511 I debugvar 'DoOptionByteLoading' = 0x0 (0) [cbuild_run]
0000511 I debugvar 'TraceClk_Pin' = 0x40002 (262146) [cbuild_run]
0000511 I debugvar 'TraceD0_Pin' = 0x20009 (131081) [cbuild_run]
0000511 I debugvar 'TraceD1_Pin' = 0x2000a (131082) [cbuild_run]
0000511 I debugvar 'TraceD2_Pin' = 0x40005 (262149) [cbuild_run]
0000511 I debugvar 'TraceD3_Pin' = 0x2000c (131084) [cbuild_run]
0000516 I AHB5-AP#0 IDR = 0x14770015 (AHB5-AP var1 rev1) [discovery]
0000517 I AHB5-AP#0 Class 0x1 ROM table #0 @ 0xe00fe000 (designer=020:ST part=482) [rom_table]
0000518 I [0]<e00ff000:ROM class=1 designer=43b:Arm part=4c9> [rom_table]
0000518 I   AHB5-AP#0 Class 0x1 ROM table #1 @ 0xe00ff000 (designer=43b:Arm part=4c9) [rom_table]
0000520 I   [0]<e000e000:SCS M33 class=9 designer=43b:Arm part=d21 devtype=00 archid=2a04 devid=0:0:0> [rom_table]
0000520 I   [1]<e0001000:DWT M33 class=9 designer=43b:Arm part=d21 devtype=00 archid=1a02 devid=0:0:0> [rom_table]
0000521 I   [2]<e0002000:BPU M33 class=9 designer=43b:Arm part=d21 devtype=00 archid=1a03 devid=0:0:0> [rom_table]
0000522 I   [3]<e0000000:ITM M33 class=9 designer=43b:Arm part=d21 devtype=43 archid=1a01 devid=0:0:0> [rom_table]
0000523 I   [5]<e0041000:ETM M33 class=9 designer=43b:Arm part=d21 devtype=13 archid=4a13 devid=0:0:0> [rom_table]
0000524 I   [6]<e0042000:CTI M33 class=9 designer=43b:Arm part=d21 devtype=14 archid=1a14 devid=40800:0:0> [rom_table]
0000524 I [1]<e0040000:TPIU M33 class=9 designer=43b:Arm part=d21 devtype=11 archid=0000 devid=ca1:0:0> [rom_table]
0000525 I [2]<e0044000:DBGMCU class=15 designer=020:ST part=000> [rom_table]
0000533 I CPU core #0: Cortex-M33 r0p4, v8.0-M architecture [cortex_m]
0000533 I   Extensions: [DSP, FPU, FPU_V5, MPU] [cortex_m]
0000533 I   FPU present: FPv5-SP-D16-M [cortex_m]
0000534 I Setting core #0 (Cortex-M33) default reset sequence to ResetSystem [cbuild_run]
0000534 I 4 hardware watchpoints [dwt]
0000537 I 8 hardware breakpoints, 1 literal comparators [fpb]
0000662 I Semihost server started on port 4444 (core 0) [server]
0000718 I GDB server started on port 3333 (core 0) [gdbserver]
When running, ![]() changes to
changes to  . Use it to stop
the GDB session anytime.
. Use it to stop
the GDB session anytime.
Notes
- When you have several solutions in one folder, VS Code ignores the
tasks.jsonandlaunch.jsonfiles that you created for each solution. Instead, VS Code generates new JSON files at the root of the workspace in a.vscodefolder and ignores the other JSON files. As a workaround, open one solution first, then add other solutions to your workspace with the File > Add Folder to Workspace option. - If you are using a multi-core device and you did not specify a
"processorName"in thelaunch.jsonfile, select the appropriate processor for your project in the Select a processor drop-down list at the top of the window. - If you want to run the application on an Arm FVP simulation model, you need to configure it in the Manage Solution dialog.
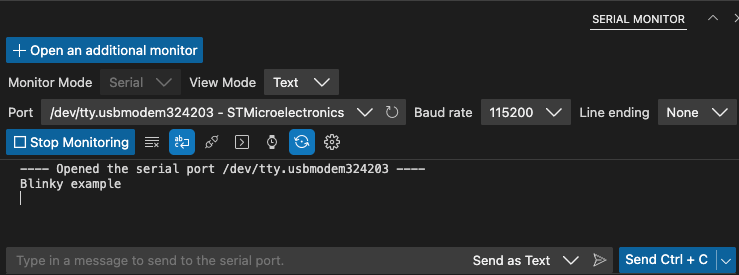
Monitor printf messages
Keil Studio includes the Serial Monitor extension that connects to the target's serial output port. If your example
contains printf statements, use the Serial Monitor to observe them.